IMTS 2014 - ZEISS Industrial Metrology will spotlight several new measurement technologies at IMTS 2014
The new ZEISS CONTURA coordinate measuring machines with navigator technology for active sensors allow faster scanning of circular features while also increasing accuracy.
MAPLE GROVE, Minn., Aug. 21, 2014 -- ZEISS Industrial Metrology has announced it will feature several new products at IMTS 2014 (International Manufacturing Technology Show) that enhance customer productivity, increase accuracy and reduce energy consumption.
The new ZEISS CONTURA coordinate measuring machines with navigator technology for active sensors allow faster scanning of circular features while also increasing accuracy. navigator will automatically calculate the optimal scanning speed based on tolerances, feature size, probe stiffness and probe weight. ZEISS CONTURA aktiv now comes standard with navigator, following suit with ZEISS PRISMO and ZEISS ACCURA which already integrate this technology. The QuickChange option, which accelerates how fast the machine automatically changes sensors, is also available for the ZEISS CONTURA aktiv. ZEISS AirSaver option can also be integrated for more savings as it reduces compressed air consumption by up to 60 percent depending on the application. The proven features of the CONTURA also include its efficient, highly precise air bearings.
The new ZEISS CALYPSO 2014 software contains dozens of new commands that shorten the time it takes to create a measurement program. Some key highlights include touch-enabled functionality allowing faster modification of 3D models and measurements, 100 percent measurement run simulation, and the ability for a user to adapt the interface to their own personal needs.
Laser line and surface finish sensors
ZEISS LineScan, available in three different measuring ranges, empowers users to quickly create 3D models of complex products where no detailed drawings exist. The 3D models can then be used to create drawings for manufacturing. This saves weeks of time versus manually re-creating drawings.
ZEISS ROTOS takes precision surface finish measurements with a production CMM, which makes inspection more efficient because the measurement results and reports are stored in the same database as the rest of the inspection results. Inspection is also more productive by eliminating the need to move the workpiece to a separate surface measuring machine.
Flexible surface and roundness measurement systems
The NEX series of surface and roundness instruments allows both types of measurements to be completed with one system. SURFCOM NEX offers a single hybrid detector to measure surface texture and contour at the same time. RONDCOM NEX offers best-in-class spindle accuracy and allows optional surface roughness measurements in the horizontal, vertical and radial axes.
Temperature and data management
The ZEISS TEMPAR package records room temperatures with the highest precision and enables the exact monitoring of the machine environment, resulting in more precise measurements. The clearly arranged user interface enables customers to record, display and save sensor data and calibration information. Local and global access to temperature data is possible in combination with ZEISS PiWeb software.
An enhanced version of PiWeb quality data management software, tailored for small and medium-sized businesses will also be launched at IMTS 2014. PiWeb SBS (Small Business Solution) software allows customers to standardize a reporting system across a wide range of ZEISS metrology inspection devices. Engineering, production and quality managers can be given access to view personalized reports independently and remotely.
www.zeiss.com/metrology
Featured Product

3D Vision: Ensenso B now also available as a mono version!
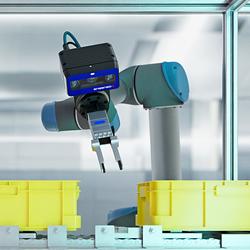
This compact 3D camera series combines a very short working distance, a large field of view and a high depth of field - perfect for bin picking applications. With its ability to capture multiple objects over a large area, it can help robots empty containers more efficiently. Now available from IDS Imaging Development Systems. In the color version of the Ensenso B, the stereo system is equipped with two RGB image sensors. This saves additional sensors and reduces installation space and hardware costs. Now, you can also choose your model to be equipped with two 5 MP mono sensors, achieving impressively high spatial precision. With enhanced sharpness and accuracy, you can tackle applications where absolute precision is essential. The great strength of the Ensenso B lies in the very precise detection of objects at close range. It offers a wide field of view and an impressively high depth of field. This means that the area in which an object is in focus is unusually large. At a distance of 30 centimetres between the camera and the object, the Z-accuracy is approx. 0.1 millimetres. The maximum working distance is 2 meters. This 3D camera series complies with protection class IP65/67 and is ideal for use in industrial environments.
