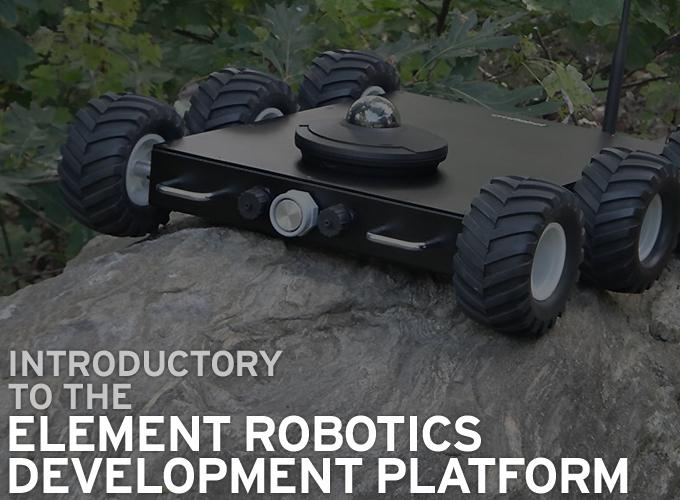
Fast robotics development using the Element Robotics Development Platform and the .NET framework.
Guy Cefalu, Product Architect | cmRobot
Hopefully, I can ramble enough to explain how useful the Element Robot Controller is, and help you get started quickly with robotics development.
So, to control robots, you have to obviously have some control software. The software has quite a few tasks to perform, but basically it has to do the following:
- Control motors/actuators/servos.
- Read sensors and interpret their meaning.
- Perform an action based on the sensor input.
I know the list above is very elementary, but it’s a good starting point for discussion.
Interfacing Motors/Actuators/Servos:
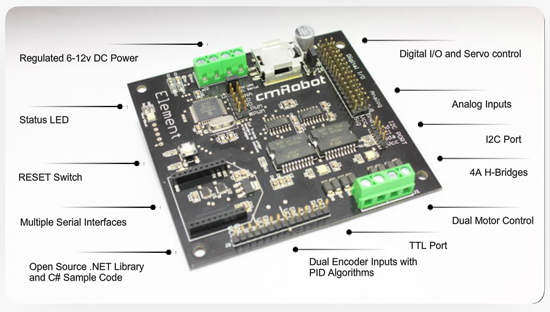
Regarding point 1, everyone interfaces microcontrollers to DC motors using an h-bridge. This requires some low-level bit twiddling to send a PWM (Pulse Width Modulated) output to the h-bridge, which then makes the motors work. So, typically, you have to purchase an additional h-bridge to interface your motors (costing $50-$100). In addition, you have to write(and debug) the low-level software to control the h-bridges. The Element robot controller has built-in dual 4 Amp h-bridges, and also has the ability to interface external H-Bridges, if the onboard 4 Amp h-bridges aren’t enough. So, you’re not stuck w/ the onboard h-bridges. Thus, you could spend time re-implementing the control software for the h-bridges, but why? It’s been done a million times before.
Almost all robotics kits use standard servos. To interface a servo, you basically just need an I/O line from your microcontroller, power, ground, and write some control software to send the correct pulse width to the servo, so that it goes to the desired position. While this is pretty easy to do, it’s yet another piece of code that you have to write (and debug). The Element robot controller supports control of up to 6 servos, and implements this code for you.
By the way, the Element’s I2C port is a perfect way to expand the functionality of the Element, without using up a lot of I/O lines.
Interfacing Sensors:
In order for your robot to sense and “see” it’s surroundings, it obviously needs sensors. There are many sensors available for measuring distance to an object, temperature, direction/heading, distance traveled, and many more. In addition sensors have different ways to interface them to query the information, which includes analog, pwm, i2C, SPI, and others.
As you can see, you’ll have to write (and debug) software to interface all of these sensors, which can be a real pain (and can be VERY time consuming). So we decided to take all of the most popular sensors on the robotics market, and provide a physical and a .NET software interface for them via the Element. The Element robot controller can read up to five 10-bit analog sensors, up to 127 I2C devices, and up to ten I/O sensors.
Once you have written software to read the values of the sensors, you have to interpret it. This might mean converting a 10-bit analog value to a meaningful distance, or converting the number of ticks your wheel encoders reported to a distance.
Again, all of this sensor interfacing & interpretation is packaged for you within the Element firmware and .NET libraries.
Making decisions:
Once you have collected all of the sensory inputs, and have translated them to a meaningful value, you need to make decisions on what action to perform (if any).
This is actually the fun part of software development, because you are adding intelligence to your robot. Obviously as a beginner, you could start out with simple behaviors to allow your robot to follow a line, navigate through a maze, etc. Eventually, you can add higher intelligence to allow you robot to plan out a path to take, recognize objects (via vision), and perform useful tasks.
Before I get too deep into this subject, lets’ summarize what the Element robot controller does for you, and how to interface to it.
Utilizing the Element Robot Controller:
As you have read, the Element interfaces the most common robotic sensors on the market and converts the signals returned from the sensors into a meaningful value (such as distance, temperature, etc.).
So, how do you get that information from the Element and/or control it? Well, there are a few ways:
Your application uses the Element Protocol, which is defined in the Element User Guide, to query these values and/or control motors/servos via a serial connection.
You use our Element .NET library to implement the protocol for you, and you just use the simple to use .NET object interface to query sensors and/or control motors/servos.
Point 1 requires you to open a serial port, and send the various commands (e.g. ‘pwm, ‘sensor’, ‘pping’), defined in the Element Protocol to the Element to query sensor values and/or control motors/servos. You can also open up a ‘Hyperterm’ session, and send the same commands to the Element for debugging purposes.
Point 2 implements the protocol for you, and handles all of the communications behind the scenes. What does this mean? Well, it means we made it even EASIER for you to control your robot via the Element!. You don’t have to worry about the communications portion of the software, which implies coming up w/ a useful scheme for querying the sensors, whilst not blocking other code that needs executing.
Regarding the .NET Library, we have examples for every supported component embedded in the MSDN help, under each component topic (called ‘Example Source Code’). You can download the library, as well as download instructions for installing the library on the Element page, under the downloads tab. You will also need to install the .NET 2.0 Framework or later on your computer.
Programming Environment:
While we don’t offer Linux support, it is still pretty simple to interface the Element under Linux, as you only need to open a serial port, and send commands/handle responses (e.g. point 1 above). The platform works with Mono (the open source, cross platform implementation of C#) as well.
However, if you plan on developing an application under Windows, then you’re in luck.
You can download one/or both of the Visual Studio Express Editions for free here:
- Visual C# Express Edition
- Visual Basic Express Edition
Currently, our sample code is written in C#, so I would suggest starting out programming with C#.
Serial Connection:
There are three ways to physically connect your Element to your PC/Laptop/PC104/etc to communicate with it:
- TTL serial connection/cable
- USB connection/cable
- XBEE/wireless
No matter which physical connection you choose, your application sees these devices as serial ports, and thus you can simply send the same command to all four interfaces w/o a code change (except for changing the COM port that the OS has assigned to that specific serial port). How easy is that!
The life of a command:
So, let’s say you decide to use the Element .NET library…How exactly does that work? Well, I’m going to hide most of the details, but give you enough to fully understand what happens in the life of a command:
Let’s say you create a GP2D120 object using the .NET Library. Once you do, you’ll want to set a few properties regarding the Analog input line that it is connected to on the Element, as well as the frequency for which you want to query the sensor. Here’s a sample application to create a Sharp GP2D120 sensor connected to Analog Pin 1, and query it every 50msec. The app also specifies a threshold of 0.5, which means that you don’t want the .NET library to notify you that the value of the sensor has changed, unless it has changed by a value of more that 0.5. The application also signs up to hear an event, called ‘DistanceChanged’, which will occur if the value changes by more than the specified threshold amount.
using cmRobot.Element;

using cmRobot.Element.Ids;
using cmRobot.Element.Sensors;
using cmRobot.Element.Components;
using cmRobot.Element.Controllers;
using System;

namespace test
{
       class Program
       {
              static Element element;
              static GP2D120 irSensor;

              static void Main(string[] args)
              {
                      serializer = new Element();

                      irSensor = new GP2D120(element);
                      irSensor.Pin = AnalogPinId.Pin1;
                      irSensor.UpdateFrequency = 50;
                      irSensor.DistanceChangedThreshold = 0.5;
                      irSensor.DistanceChanged += new ElementComponentEventHandler(irSensor_DistanceChanged);

                      element.Run();
              }

              static void irSensor_DistanceChanged(ElementComponent sender)
              {
                      Console.WriteLine("new gp2d120 distance: {0}", irSensor.Distance);
              }
       }
}
|
You will also see that there is a method called irSensor_DistanceChanged(), which is basically an event handler, to catch the DistanceChanged event as it occurs.
Once the event occurs, this method will be executed, and in this instance, we’re just printing the distance that the sensor is reading. Of course, you could make decisions to slow down the motors, turn the robot, or whatever.
So, if you run this application, and have the GP2D120 sensor connected to the Element (and it is powered up), you will be able to move your hand in front of the sensor, and see the line “new gp2d120 distance: XXX” printed to the screen.
How does this happen???
Well, to begin with, when you create a GP2D120 object in the .NET library, the .NET library knows that it needs to send a ‘sensor
Once you invoke Element.Run() (or you can call Element.PumpEvents() from a while loop), the library is sending that command down to the Element at the frequency we specified above, and it waits to hear the response. Once it receives the response from the Element, it stores the translated sensor value into the GP2D120s Distance property, which you are free to use at any point. It also stores the raw analog value in the Value property, in case you want to do something with it.
Thus, your .NET application doesn’t have to block (although it can) to wait on the round-trip query to/from the Element for sensors.
The same exact thing happens for all sensors and components within the .NET library. Thus, all communication to/from the Element is handled for you, and you’re just left to read the properties of the .NET objects you’ve created. It just doesn’t get any easier than this…
This frees your app up to perform useful work, such as navigation, mapping, etc.
Summary:
- Download and install the .NET 2.0 or later Framework.
-
Download and install Visual C# Express Edition. -
Download and follow the Element .NET Library QuickStart Guide. -
Peruse through our examples in the Element .NET Library Documentation. -
Modify our existing sample apps to make your own.
So, hopefully, this has explained the usefulness of the Element for fast robotics development using the .NET framework, and given you a good starting point for getting an application up and running fast.
About cmRobot

Founded in 2010, cmRobot designs advanced research & development robotic platforms for academic and commercial development.
The content & opinions in this article are the author’s and do not necessarily represent the views of RoboticsTomorrow
Featured Product